Technology Gazette Site

Tech Nerd

5 Best Mobile Apps To Simplify Logistics & Supply Chain Operations

Delivering goods in real-time and meeting consumer demands is crucial to logistics and supply chain management (SCM) business. To stay ahead of the competition, many logistics and SCM professionals utilize mobile devices and applications that track inventory and shipments, execute procurement transactions and reordering processes, and collaborate in real-time with external and internal supplier partners. In addition, there are applications that even inform you when your customers post negative ratings and comments about your brand on social media.

Tapping into these mobile tools can help you streamline your supply chain functionality, profitability, and productivity. In this article, we have highlighted some of the top logistics and supply chain management applications that can help you easily break down the logistics, SCM, and warehouse management barriers.

5 Logistics & Supply Chain Management Mobile Applications:

1. Logistics – A free Android mobile app designed to track vehicles, drivers, shipments, and clients. It is one of the best all-in-one mobile applications in the logistics and SCM space. If you are juggling with the logistics and warehousing operations, then Logistics app is the right solution to consider. It provides some serious operational capabilities that can help you extend visibility into your entire supply chain right from your mobile phone.

2. TomTom WEBFLEET – In the absence of your workforce, it is difficult to gain control over day-to-day operations. For this reason, TomTom created an application called WEBFLEET that tracks daily operations for your logistics business. It is an online mobile app that allows you to manage your fleets 24 hours a day. It is accessible via a web browser where managers can manage the entire field operations in real-time on their laptops or smartphones.

3. Vehicle Inspection – Logistics customers often demand visibility and flexibility in car delivery. And the Vehicle Inspection app provides just that. It helps you to streamline inspection process and deliver on-time services to customers. It is an automated app built using Xamarin, a cross-platform development methodology. It simplifies pre-delivery car inspection process, facilitates seamless collaboration between shipping agents, customers, and truckers, provides automated and paper-free inspection process, and delivers customized inspection services to customers.

4. EazyStock – A cloud-based inventory optimization software for simplifying forecasting and inventory planning. EazyStock helps to reduce the excess and obsolete stock levels (i.e. bad inventory) from your warehouses to lower down costs while extending the availability of your profitable products. It offers easy API integration with any ERP (Enterprise Resource Planning) system. This helps inventory managers to automate the procurement and replenishment processes which historically were a guesswork resulting in reduced profit margins. EazyStock also includes attractive KPI dashboards that display how you stack up every month and call out areas where the costs can be reduced.

5. CoPilot Truck – This map and direction routing tool can be a game-changer for any professional truck driving business. It is an easy to use mobile app, providing essential turn-by-turn navigation. But it’s not your average Google Maps app. CoPilot Truck offers some extra algorithms to help truck drivers follow more efficient routes based on dynamic information such as routing parameters, truck height, weight recommendations, and load type for transporting hazardous material.

Which one of these apps would you use for your logistics business? Are there any other apps worth giving a consideration? Please let us know in the comments below.

8 Outsourcing Checklist Before You Outsource .Net Development


Outsourcing has many benefits like cost savings, team management and faster time to market. But what are the motives of outsourcing .NET development? Today, many companies have an in house .NET service team, but they still outsource for better profits and fulfill their requirements with the rise in competition. This article provides you a brief idea about how to choose an outsourcing software development team to help you with .NET framework.

Outsourcing is the right development model for companies that have a limited budget and require high-end web development solutions at cost-effective prices. This is where you can hire dot net programmers from a .NET development service provider.


But before you hire .NET developer for any development project, what are the points you need to evaluate? You can consider the following:

1. The programmers must be trained, qualified and experienced in developing quality solutions using .NET framework to accomplish a solution in less time and within budget

2. They are certified from Microsoft for .Net development

3. They need to showcase their experience by presenting some past projects they’ve executed with some references

4. What is the risk mitigation strategy? How will they help in updating the solution?

5. They should also create good documentation and be training friendly to help your in-house teams

6. They help you in achieving cost-effectiveness throughout the project without compromising with the quality

7. They are good in communication through various channels like e-mails, chat, video conference and are able to deliver accurate status of the development work done

8. They must be flexible and scalable when the demand rises

Considering the above points will help you find your suitable outsourcing partner. Have you outsourced work before and faced any difficulty? What was the business model used during outsourcing? What technologies did you outsourced the work for? Did you achieve cost advantage compared to in-house development? Feel free to leave them in the comments.

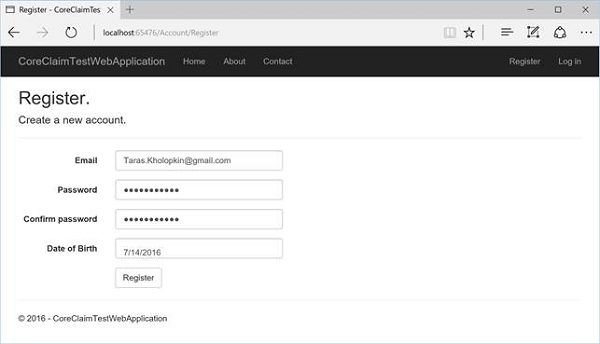
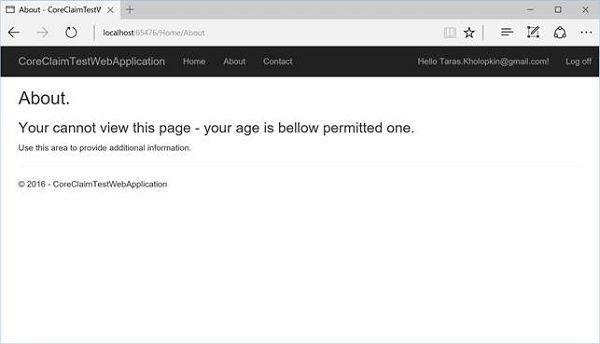
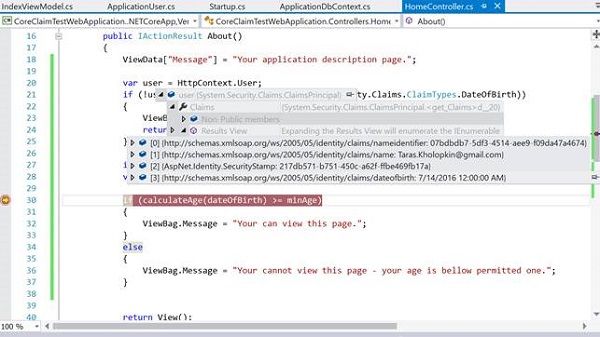
Claim Based Security In ASP.NET Core In Just 8 Easy Steps

With Microsoft taking the OSI route, ASP.NET Web platform and ASP.NET project have undergone some significant changes. Also ASP.NET MVC Views and Controllers had minor transformation with the new platform skeleton. Let us go through the brief outline of the recent updates and how to implement claim based security in ASP.NET Core.

What is a Claim?

It is an attribute of identity that defines permissions. Permission means the step taken to perform the action and claim reside in the Microsoft.AspNetCore.Identity library. For successful dot net application development, we must look at the basic concepts for building a claim-based security and learn how to implement by creating an application on ASP.NET Core.

First we will create a “Hello World" ASP.NET Core web application using .NET core framework. To learn more about how to use Visual Studio and create ASP.NET Core applications, visit here:


In the above screenshot, the default template of Visual Studio .NET Web Project contains all the namespaces and assemblies required for our test project. Once the project is setup, we now need to focus on implementing a simple functionality -> Add a new Claim during the user registration/creational process and then apply the authorization restriction to the user with the Claim specified.

We need to use the below code in Startup.cs class which will help implement the security at application bootstrap, including security:

public class Startup
{
// Setting up the hosting environment
// and configuration
public Startup(IHostingEnvironment env)
{
var builder = new ConfigurationBuilder()
.SetBasePath(env.ContentRootPath)
.AddJsonFile("appsettings.json", optional: true,
reloadOnChange: true)
.AddJsonFile($"appsettings.{env.EnvironmentName}.json",
optional: true);
if (env.IsDevelopment())
{
// For more details on using the user secret store see
// http://go.microsoft.com/fwlink/?LinkID=532709
builder.AddUserSecrets();
}
builder.AddEnvironmentVariables();
Configuration = builder.Build();
}
public IConfigurationRoot Configuration { get; }
// This method gets called by the runtime. Use this method
// to add services to the container.
public void ConfigureServices(IServiceCollection services) {
// Add framework services.
services.AddDbContext(options =>
options.UseSqlServer(Configuration.GetConnectionString
("DefaultConnection")));
// Add Identity stuff to the application services
services.AddIdentity()
.AddEntityFrameworkStores()
.AddDefaultTokenProviders();
services.AddMvc();
// Add application services.
services.AddTransient();
}
// This method gets called by the runtime. Use this method to
// configure the HTTP request pipeline.
public void Configure(IApplicationBuilder app,
IHostingEnvironment env, ILoggerFactory loggerFactory)
{
loggerFactory.AddConsole(Configuration.GetSection
("Logging"));
loggerFactory.AddDebug();
if (env.IsDevelopment())
{
app.UseDeveloperExceptionPage();
app.UseDatabaseErrorPage();
app.UseBrowserLink();
}
else
{
app.UseExceptionHandler("/Home/Error");
}
app.UseStaticFiles();
// Enable the application to use a cookie to store information
// for the signed-in user and to use a cookie to temporarily
// store information about a user logging in with a
// third-party login provider
app.UseIdentity();
// Add external authentication middleware below. To configure
// them, please see http://go.microsoft.com/fwlink/?LinkID=532715
app.UseMvc(routes =>
{
routes.MapRoute(
name: "default",
template: "{controller=Home}/
{action=Index}/{id?}");
});
}
}

Next we will look at Models\ApplicationUser.cs class which contains an ApplicationUser class that derives from Microsoft.AspNetCore.Identity.EntityFrameworkCore.IdentityUser:

Add profile data for application users by
// adding properties to the ApplicationUser class
public class ApplicationUser : IdentityUser
{
}

The above public class will be empty, where we need to add our claims. We will do it by applying code changes to demonstrate Claim-based security in real life using eight easy steps:

Step 1 - Enable Entity Framework Migrations – You need to enable “Entity Framework Migrations" if there are any iterative changes to Claims planned, as ASP.NET Identity uses Code First, auto-migration would be useful to perform database schema updates.

Step 2 - Add Relevant Properties - Now add all relevant properties to the ApplicationUser class (in file Models\ApplicationUser.cs) to store the Claims. We will take "BirthDate" and add this property to ApplicationUser. Do not forget to add the using System clause before class definition.

Step 3 - Add EF Migration – For updating database with the new added field. In the Package Manager Console, perform the following steps:
  • Add-Migration "Age" to create an upgrade script for our modification.
  • Update-Database to run a database schema update.

Now, we will implement the filling out of the Birthday value by adding a Birthday parameter to the User Registration form in the Models\AccountViewModels\RegisterViewModel.cs RegisterViewModel class using the below code:

public class RegisterViewModel
{
[Required]
[EmailAddress]
[Display(Name = "Email")]
public string Email { get; set; }
[Required]
[StringLength(100, ErrorMessage = "The {0} must be
at least {2} and at max {1} characters long.",
MinimumLength = 6)]
[DataType(DataType.Password)]
[Display(Name = "Password")]
public string Password { get; set; }
[DataType(DataType.Password)]
[Display(Name = "Confirm password")]
[Compare("Password", ErrorMessage = "The password
and confirmation password do not match.")]
public string ConfirmPassword { get; set; }
[Required]
[Display(Name = "Date of Birth")]
[DataType(DataType.Date)]
public DateTime BirthDate { get; set; }
}

Step 4 - Update the Views\Account\Register.cshtml File – Use the below code and update

...
class="col-md-2 control-label">
class="form-control" />
class="text-danger">
...

We also need to create a new account and test the new added field


Step 5 - Update the Controllers\AccountController.cs Register Method – We need to update the class method to pass the Birthday field in the above screenshot

// POST: /Account/Register
[HttpPost]
[AllowAnonymous]
[ValidateAntiForgeryToken]
public async Task Register(RegisterViewModel model,
string returnUrl = null)
{
ViewData["ReturnUrl"] = returnUrl;
if (ModelState.IsValid)
{
var user = new ApplicationUser { UserName = model.Email,
Email = model.Email, BirthDate = model.BirthDate };
var result = await _userManager.CreateAsync(user,
model.Password);
if (result.Succeeded)
{
// For more information on how to enable account confirmation
// and password reset, please visit
// http://go.microsoft.com/fwlink/?LinkID=532713
// Send an email with this link
// var code = await
// _userManager.GenerateEmailConfirmationTokenAsync(user);
// var callbackUrl = Url.Action("ConfirmEmail",
// "Account", new { userId = user.Id, code = code },
// protocol: HttpContext.Request.Scheme);
// await _emailSender.SendEmailAsync(model.Email,
// "Confirm your account",
// $"Please confirm your account by clicking this link:
// link");
await _signInManager.SignInAsync(user, isPersistent: false);
_logger.LogInformation(3, "User created a new account
with password.");
return RedirectToLocal(returnUrl);
}
AddErrors(result);
}
// If we got this far, something failed, redisplay form
return View(model);
}

Step 6 – Add the Claims - We need to create a mechanism for adding the Claims in ASP.NET Core with Microsoft.AspNetCore.Identity.SignInManager, by default. It includes only username and user identifier claims. SignInManager uses IUserClaimsPrincipalFactory to generate ClaimsPrincipal from TUser (in our case, from ApplicationUser).

We need to create our own implementation of IUserClaimsPrincipalFactory to add custom claims. We do not require the boilerplate code to be generated. We will simply derive it from the default UserClaimsPrincipalFactory which is already implementing IUserClaimsPrincipalFactory.

public class CustomClaimsPrincipalFactory :
UserClaimsPrincipalFactory
IdentityRole>
{
public CustomClaimsPrincipalFactory(
UserManager userManager,
RoleManager roleManager,
IOptions optionsAccessor) :
base(userManager, roleManager, optionsAccessor)
{
}
public async override Task
CreateAsync(ApplicationUser user)
{
var principal = await base.CreateAsync(user);
// Add your claims here
((ClaimsIdentity)principal.Identity).
AddClaims(new[] {
new Claim(ClaimTypes.DateOfBirth,
user.BirthDate.ToString())
});
return principal;
}
}

Step 7 - Register CustomClaimsPrincipalFactory​

// This method gets called by the runtime. Use this method
// to add services to the container.
public void ConfigureServices(IServiceCollection services)
{
// Add framework services.
services.AddDbContext(options =>
options.UseSqlServer(Configuration.
GetConnectionString("DefaultConnection")));
// Add Identity stuff to the application services.
services.AddIdentity()
.AddEntityFrameworkStores()
.AddDefaultTokenProviders();
// Add Custom Claims processor
services.AddScoped,
CustomClaimsPrincipalFactory>();
services.AddMvc();
// Add application services.
services.AddTransient();
}

Step 8 – Verify the Claim Security – Once the Claim setup is done with the above code, we now need to verify it. It is a common practice to write custom Authorize filters to verify the availability and particular value of the Claim pair, and then put that filter on the controllers' actions. The Claim “BirthDay" requires more checks, so we will implement verification of the Claim just for demonstration purposes in the Controllers\HomeController.cs About method using the below code:

public IActionResult About()
{
ViewData["Message"] = "Your application description page.";
var user = HttpContext.User;
if (!user.HasClaim(c => c.Type ==
System.Security.Claims.ClaimTypes.DateOfBirth))
{
ViewBag.Message = "Cannot detect the Age -
Claim is absent.";
return View();
}
int minAge = 16;
var dateOfBirth = Convert.ToDateTime(user.FindFirst(c =>
c.Type == System.Security.Claims.ClaimTypes.DateOfBirth).Value);
if (calculateAge(dateOfBirth) >= minAge)
{
ViewBag.Message = "Your can view this page.";
}
else
{
ViewBag.Message = "Your cannot view this page -
your age is bellow permitted one.";
}
return View();
}
private int calculateAge(DateTime dateOfBirth)
{
int calculatedAge = DateTime.Today.Year - dateOfBirth.Year;
if (dateOfBirth > DateTime.Today.AddYears(-calculatedAge))
{
calculatedAge--;
}
return calculatedAge;
}

Any Claim can be extracted easily from the HttpContext.User at any point of the project. Now try to verify the code by registering one account with DOB (07/14/2016) and we will see the below result:


In the debug mode we will see the code like this:


Conclusion

This was one way to set up Claim-based security in ASP.NET Core with the help of ASP.NET Core Identity. Previously, it was very easy to add the Claims directly in the ApplicationUser implementation via overriding the GenerateUserIdentityAsync() method. But in ASP.NET Core, we need to implement IUserClaimsPrincipalFactory that is internally used by SignInManager. We also got more structured classes and interfaces implementation in ASP.NET Core, as logically SignInManager should indeed control sign-in processes (including claims) and ApplicationUser should be just an IdentityUser.

Let us know if you faced any difficulty in the comments section.

7 Libraries To Use For Android Development

Android application development has gained immense traction in recent times. Android developers are able to develop applications faster using many popular, out of the box Android development tools and frameworks like Android Studio with Gradle and Eclipse among many others. Apart from that, there are a number of open source libraries that developers use on a daily basis. In this article, we have highlighted seven of the best Android libraries that developers must use for custom Android mobile app development.
7 Best Libraries For Android Development:
1. Dagger: Dagger is a widely used dependency injection library for Android development. It is a lightweight dependency injection without any extra bells or whistles. It is both simple and a fast dependency injector for Android as well as Java. Dagger comes with two pieces: a Dagger library with 100kb in size, and a Dagger compiler.

The Dagger library comprises all the essential logic and some annotations. It even uses the standard javax.inject annotations, which makes your code portable between various different injection frameworks like Spring or Guice. As Dagger is the simplest and most lightweight DI frameworks, it does not include all the fancy features offered by other larger frameworks. But it is relatively faster and does its job. It is worth using when you only want to use a plan dependency injection for your project.

Google and Square lead the development of Dagger and it is licensed under Apache License 2.0. You can access Dagger here.

2. LeakCanary:
LeakCanary is an open-source memory leak detection library for both Android and Java development. It enables you to easily detect leaking objects by simply adding a couple of lines of Java code to your existing source code. LeakCanary is free and easy to use. Like Dagger, LeakCanary's development is led by Square. Also, it is licensed under Apache License 2.0. You can look for LeakCanary here.

3. ZXing:
In the world of machine-readable data, use of Barcodes and QR codes has already become a standard. ZXing has been around for quite some time and was originally written in Java. ZXing can read and create barcodes on several platforms. It has also been ported to various different languages. Since this library has been around for a while, it already has a large user base. For instance, the QR code app you're using in your smartphone is probably using the ZXing library. It works well and performs as expected.

ZXing's development is led by Sean Oven, Daniel Switkin, and the ZXing team. Alike Dagger and LeakCanary, ZXing is also licensed under Apache License 2.0. You can find ZXing here.

4. Retrofit:
Retrofit is another Android library developed by Square. It seems Square is pretty good with writing Android libraries. Retrofit is a library that can transform your REST API into Java interface. It is popular and a type-safe REST client for Android as well as Java development. It enables you to write clean code by leveraging Java for communication with almost any RESTful API.

Again, Retrofit is a lightweight Android library and relatively easier to use. It is licensed under Apache License 2.0 and can be accessed from here.

5. Libphonenumber:
Android developers have limited options when it comes to formatting and parsing phone numbers. But thanks to the team at Google they have come out with a library called Libphonenumber. It is the best and most extensive library for parsing, validating, and formatting contact numbers. Libphonenumber consists of a simple and easy to use API. It has been ported to many different languages off the JVM such as PHP and C#. Even Libphonenumber is licensed under Apache License 2.0. You can download the library here.

6. Jitpack.io:
Jitpack.io is a library created by the team at Streametry Ltd. It can be used for building any Github project and publishing it to public Maven repo. Using this library you can save a lot of your time and hassle while building dependencies. Jitpack.io is one the easiest methods to publish any Github project as a Maven dependency. It uses customized terms of usage license. To get more information on Jitpack.io, navigate here.

7. Tape:
One more library developed by Square, Tape is basically a collection of classes that enable queue handling. It is a great library to handle data streams and download data in unstable environments. Instead of manually coding the queue handling task, Tape itself takes care of it. If anything goes wrong, Tape automatically tries to run the command or perform the operation again. It also caches all the intermediate results automatically, which is another great feature in Tape. It has been placed under Apache Licence 2.0. You can find Tape here.
Do you use any other library for your Android project? Please share with us using the comments below.

5 Tips To Convert Your Business Into A Sales Powerhouse With CRM

A CRM (Customer Relationship Management) software is an invaluable tool for simplifying business management. Implementing the right CRM solution for your organization can increase sales efficiency – you can quickly close more deals, automate sales processes, and enhance forecast accuracy. It provides best strategies for business success by tracking each and every interaction with your customer and automating activities. This includes tracking every customer’s journey from interest in your product or service to purchasing it. This article presents five ways a CRM can help you increase your sales.


5 Tips To Increase Sales Using a CRM:
  1. Seamlessly capture valuable customer data – Following up on a lead is important, but what if the data you captured is incomplete, incorrect, or unavailable? To avoid collecting such data, implement a CRM for your sales staff that will capture customer information seamlessly through an automated system. This will help you maintain data integrity alongside storing all the information on one system so calls and emails can be made without having to switch to other communication tools and channels. With a CRM system, you can have a comprehensive view of each customer’s information and their interaction with your business.

  1. Convert qualified leads into sales – Sales teams often waste their time and efforts chasing a lead that doesn’t convert to a sale. That’s where a CRM system allows you to chase qualified leads by providing sales teams instant access to information about potential customers who have shown interest and with whom there’s a chance to convert their interest into sales. A CRM software also allows managers and CEOs to set KPI which the sales teams can track easily and check whether they are meeting their targets just by clicking a button.

  1. Establish sales workflows – In order to increase sales productivity, it is essential to eliminate manual sales processes and data entry. A CRM can help you establish and automate your sales workflows to boost your productivity and drive quick results. You can nurture the potential of existing customers using the automation features. The automation features can include setting up email campaigns, sending follow-up emails to the customer which will help you quickly shift them through the sales funnel. You can further use reminders, notifications, and third-party integrations to streamline your sales workflows.

  1. Obtain insights and track trends - A CRM solution such as Microsoft Dynamics CRM provides customizable dashboards that enable you to discover hidden insights in your business data. Microsoft dynamics consulting services or expert can help you customize your dashboard according to your needs including checking the number of sales, tracking the success of marketing campaigns and viewing tactics required for planning additional strategies. You can also track which product is driving more sales, and determine sales trends quickly.

  1. Rapid sales follow-up – Tracking your customer’s purchase journey precisely is a key to the success of a sale. Using CRM system can help you track your customer’s interaction with your website, mobile app, marketing channels so that you can nurture that lead and close the deal at the right time.

Though handshake has always been a traditional way of closing a deal, but with the growing needs of your business, a CRM solution can help you scale outreach, increase productivity and drive more sales. Have you implemented a CRM for your sales teams? How do you use it to close more deals? Let us know in the comments below.


Why Use Cloud-Based Order Management System?


Order Management System or OMS is a great solution for retailers, e-commerce businesses to track the orders received from customers in real-time. OMS also tracks the customer information and warehouse inventory on hand, making it easy to manage the entire supply chain. Many enterprises use messy spreadsheets for managing their orders, but that is not the best practice you should follow. Should you buy an OMS product or develop your own OMS and outsource java development services? We will solve the dilemma by first figuring out how OMS fits into your operations.

First let’s answer the below questions:
  • Is your business creating orders based on the information received?
  • Are you notifying users about the orders being created?
  • Is there a warehouse managing your orders?
  • Are you generating documents with transaction data after the orders are executed?
  • Are you sharing the order documents to the accounting system?
Is your answer "Yes"? then OMS is a perfect fit for your business. Order management includes everything from organizing the orders your receive, stock movements, CRM, returns and refunds, billing and payments and order processing.

How different is order management compared to inventory management?

Not quite. OMS does overlap some aspects of inventory management - like tracking of enough stock for fulfilling the order, or tracking the movement of stock as orders are shipped. Both inventory & order management systems track and take charge of different parts of the supply chain workflow.
Inventory management is focused on the past orders, helping to forecast the future demand, sales trends, and order the right amount of inventory stock, making your inventory efficient. Order management is focused on organizing your real-time orders.

Should the OMS be offline or in the cloud?

The OMS helps with the fulfillment process mentioned above. You can easily track orders from customers, process and organize the fulfillment when a customer purchases something from you until it’s shipped off. It also manages vital information about your customers and sales teams. If your business is growing at rapid pace and requires flexibility and scalability then choosing cloud is a good option. Offline is used by small enterprises working in startup phase and trying to establish their brands in the market. Both cloud and offline are reliable systems to manage your orders. And they are far better than using spreadsheets or another manual system, helping you save time and correcting errors that could definitely be used for something that will grow your business instead of just maintain it!

Cloud Order Management System delivers following benefits:

  1. Helps in delivering efficient fulfillment process: As all the data is in one place, your fulfillment process will become more efficient with fewer delays. You will start to track better and achieve easy access to your orders and know their statuses.
  2. Be more organized: You will achieve organized sales orders, making the sales cycle shorter, and minimizing time to process order paperwork. The cloud OMS guarantees fewer errors from manual entry and saves time in sharing order status updates. You also get paid faster with an organized billing data that you can use to quickly make financial decisions.
  3. Improved tracking: Managing orders in the cloud means you can track orders in real-time, getting updated information and the knowledge of the current state of any of your orders at any time.

Rishabh Software’s mobile order management solution has organizations improve efficiency, reduce errors, and achieve faster supply chain process. Feel free to evaluate the solution. Have you tried any other OMS? Let us know your thoughts in the comments below.

5 Tips to Hire PhoneGap App Developer

To create an excellent mobile app requires years of expertise, skills and experience to understand the development paradigm. The best way to reach faster go to market is to outsource and hire a developer. But the problem arises while finding the right fit from the crowd of app developers. Sometimes it becomes very confusing and tedious to find the right one. Don’t worry, here are the five check list points which you need to follow for finding the ideal developer for your cross-platform app development.

1. Understand the Development Experience – Mobile developers have worked on creating different types of apps and have gained various experience, like some are good in building eCommerce mobile apps, some are good in creating gaming apps. First you need to evaluate whether the developer you are shortlisting has experience in building apps for multiple categories or just a few. That way you can evaluate the skills.

2. Document your Mobile App Requirements – Communication is a key skill played here. The more you understand your app, it would be better for the developers to understand and code. If you are not clear then the developers will not be able to deliver the desired app. You clearly need to define the scope and project requirements before passing the information to the developer. Many businesses are afraid of revealing their project details because they do not want their ideas to be used somewhere else and want to protect their IP. Simply sign an NDA document and then communicate all the details of the project.

3. Look for an Offshore Development Company – To estimate the final cost for your app becomes quite complex in a long run, making it a risky situation for managing your development budgets. To minimize the financial risk, it is a good idea to look for an offshore company offering fleet of developers to manage your app features. Different countries have different offshore development cost. Instead of hiring a native mobile app developer, offshoring is a good idea to get it built at affordable prices.

4. Proficiency in Developing Cross Platform Apps – Today there are multiple mobile platforms, making it cost intensive to develop native app for each mobile platform. To target all the mobile platforms, your app should be cross platform which can be built by using Xamarin or PhoneGap development. To develop cross-platform apps you can either hire a PhoneGap programmer that leverages HTML5, or a Xamarin developer to create apps with C#.

5. Post-Deployment Support – You must opt for post deployment services offered by developers to manage the last minute hiccups. This ensures proper protection at every stage right from development to design to post deployment support and maintenance. Simply ask the developer to be ready to work on releasing updates and fixing bugs after the launch of the app.

Conclusion:
There are numerous mobile app developers available for hire from leading app development companies. You simply need to follow the above-mentioned five steps with the skills and development rates ranging from per hour to per month. Lastly, do not forget to document a contract and list the milestones, deliverables and deadlines before selecting a developer. We hope you achieved some clarity by the above checklist. We’d love to read your additional suggestions and opinions for hiring the best developer in the comments section below.

7 Best Practices For Successful Software Testing

Just like application development, testing plays an important role in a software project lifecycle. Proper execution of software testing can help you determine the success or failure of your project accurately while saving you a huge amount of time and money.

But to ensure a realistic estimation and success of test automation project, it is essential to implement certain best practices. Here are seven software testing best practices every Microsoft development company must follow in order to ensure the accuracy and success of the software project.

Software Testing Best Practices:

Test Case Creation: The process of test case creation starts when the requirements of the software are approved. You must finalize the test case preparation while the coding is still in process so that you do not hustle during QA (Quality Assessment) execution. Use test case type field to understand the test case types while writing the test cases. The test case types can include positive test cases, negative test cases, smoke test cases and regression test cases.

Prepare Regression Test Case List: A new build of software will always have some impact on the existing functionality of the software. As a result, it is important to prepare a regression test case list which ensures that the existing functions of the software are not hampered. Enable the QA team to update the existing test cases and ensure high-quality before you hand over a new release to them. Also, following the below-mentioned practices during a new release is a must.

a) Clear the smoke tests for existing functionality and prepare new smoke tests for the current release.
b) The regression test cases must be updated. So, if the old test cases have become obsolete, mark them as obsolete and add new test cases.

Smoke Testing: Smoke tests are test cases that cover the important areas of software testing. There are about 20- 30 smoke test cases which are basic and should work whenever a new release is prepared. Moreover, a successful smoke test helps you proceed with deep testing. But in case a smoke test fails, the QA must return the build to development team. Some smoke testing best practices you must follow include:

a) Preparing a smoke test set
b) Handing over the smoke test set to the team responsible for merging the code

Further, the smoke test needs to be reviewed to ensure its meets the following:

1. A smoke test should cover all the requirements of the software
2. It should not be ambiguous
3. It should not leave any missing function uncovered during the test
4. It should be an overview of all the major functions and cover each functionality in depth
5. Smoke tests should not be large in numbers

Positive & Negative Testing: Positive testing is where a test is performed to check whether the software meets all the requirements through positive scenarios. Positive test cases are created on the basis of the requirements of the software. On the other hand, negative testing is done to check the software for any negative scenarios. The tester adds error value in the software to be tested. The negative inputs can include wrong date formats, decimals, or colons in number formats.

Performance Testing: Performance test cases are generally prepared to check the performance of the system and how it responds to different types of volume. It is divided into three main parts:

a) Performance test before and after the release of the software to determine whether the release is fast or slow
b) The tester should reboot machine and clear the cache before starting the performance testing
c) Performance testing should be done with different types of accounts for each part of the software where some parts will include large data and some will include small data

Test Case Preparation: The test case must list all the steps of test execution and each step should be easy to understand. Some of the best practices of creating test cases are:

a) Map the test cases with the requirements for better understanding of each test case
b) Each test case should consist a test case name, number, requirement and description
c) Written details of the login information
d) Mention the type of test case, for example, positive test case or negative test case

Test Case Review: While reviewing the test cases, the tester should discuss the test cases and the requirements with the team. Check the test cases for the adequacy of the information. Make sure all the team members understand the test cases and that no test case is missing. If there's any addition or deletion of any test case, mark it as modification. After reviewing all the test cases, mark the document as 'Test Cases Reviewed'.

Every enterprise must evaluate and follow the above-mentioned software testing best practices in order to set long-term goals and successfully achieve them. Does your enterprise follow any best practices for successful software testing, let us know in the comments below.


Navigation Interfaces in Xamarin.Forms

Navigation in mobile apps is a key factor contributing to the usability of the app. Confusing navigation can quickly frustrate any user and lead to bad reviews. Mobile apps need to accommodate a lot of data and views with limited screen estate, unlike desktop apps where you can have multiple views on one screen. This presents a challenge for developers and designers to come up with elegant navigation interfaces.

Xamarin application developers often face this challenge. Thankfully, Xamarin Forms has robust out-of-the-box capabilities for making navigation easy across mobile platforms and devices.

Xamarin Forms provides a number of navigation experiences like Content Page, Master Detail Page, Navigation Page, Tabbed Page, Carousel Page and Modal Page. This gives developers plenty of options to choose from and build UIs that are easy to navigate. These options can be combined to build complex navigation interfaces.

The beauty of Xamarin Forms lies in its ability to adapt UIs depending on mobile platforms (Android, iOS or Windows Phone). Using the same code-base you can get native-looking navigation elements on all three platforms. Let's take a look at an example.

Tabbed Page is one of the most common UI and Navigation elements to accommodate a large amount of data into multiple views with clear distinction. Let's say you're developing a reminder app and want to separate your week's reminders into different tabs. This can be easily achieved in Xamarin Forms with a few lines of C# code. The result you'll get is native looking tabbed pages on Android, iOS, and Windows Phone. Tab formats on all the three mobile platforms is as follows:

Android: Tabs are placed at the top and the detail area is below the tabs. Names of the tabs are automatically capitalized. You can use the swipe gesture to switch between the tabs and load the detail area of the corresponding tab. Users can also scroll through the collection of tabs if they don't fit on one screen.

Windows Phone: Windows Phone has an almost identical approach to tabbed layouts as Android with the only major difference being the names of the tabs are shown in lower case.

iOS: With iOS, the tabs are at the bottom and the detail area is loaded on the top. Each tab has an accompanying icon which should be a 90x90 PNG image. For other five tabs, you will see a more tab which can be used for additional tabs.

As it is evident from the example above, each platform treats navigation in a different way and Xamarin being a robust cross-platform app development framework does a great job in keeping it simple for developers.

In more complex mobile applications, you'll need to combine various navigation interfaces to deliver a seamless experience. For instance, hierarchical navigation is implemented to enable the user to navigate through different app pages, forwards and backward, as desired. In Xamarin.Forms it's implemented as LIFO or last-in, first-out stack of page objects. Again on each mobile platform, hierarchical navigation is treated differently and xamarin.forms take care of it out-of-the-box.

Conclusion:
In the end, choosing a navigation type depends on your app's use case. You can develop a simple app using only tabbed navigation or combine hierarchical navigation with modal page and pop-ups and give more depth to navigation on your app.

Let us know your opinions on navigation in Xamarin.Forms through the comments below.


How To Create Connected SharePoint Online Team Sites Faster?

A SharePoint team site is a common portal used among many enterprises. It helps project teams collaborate efficiently while ensuring that the clients have quick, easy access to important documents and action items to complete the project successfully. A lot of enterprises turn to custom SharePoint web development for additional business requirements. Microsoft has made SharePoint team sites stronger than ever by introducing its integration with Office 365 Groups.

There were several enhancements rolled out to SharePoint Online team sites in Office 365. It deeply connects to Office 365 Groups which offers a shared inbox, calendar, OneNote notebook, Planner for task management, a place for files and now a modern team site with lists, pages, libraries, and team news. Enterprises can now create a connected team site directly from the SharePoint home in Office 365 just within seconds.


These capabilities can collectively make your team more adaptable, connected and mobile which is a requisite to succeed in the modern digital era. Now let’s dive into the details of creating new team sites connected to Office 365 Groups at lightning speed:

Creating Connected SharePoint Teams Sites In Seconds:
  • Step 1: Users can create sites connected to Office 365 Groups directly from SharePoint home page. Click on the "Create Site" button on SharePoint homepage in Office 365. A two-step creation wizard will appear from the right
  • Step 2: You need to enter the title of your team site, select whether you want to make your group private or public, select the site classification and then click on next
  • Step 3: Add the details of the owners and members, click on Finish and it's done.
A new SharePoint team site is now up and ready-to-use. The new improvements are more intuitive to adjust to your business needs. Users can create Office 365 Groups by using services like Outlook, Microsoft Teams, Yammer and more to get access to a full-powered SharePoint Online team site.

Controlling of Create Site functionality by Admins:

SharePoint Online admins have granular control over the user availability and behavior of the "Create Site" button or command within Sharepoint home in Office 365.

Admins can either completely hide the "Create Site" button or enable it for users who have required permissions to create sites. There are a couple of other settings an admin can control for the new experience. Let's take a closer look at them.
  • Step 1: You can find the updated site creation settings in the SharePoint Online admin center inside the settings tab
  • Step 2: Admins can select to enable or disable the "Create Site" command
  • Step 3: Furthermore, admins can choose what happens when a new SharePoint site is created. These options include creating a classic site or a site within an Office 365 group
If the admins have enabled the original "Start a Site" feature for users, it's important they review the new settings to make sure it conforms to their business needs.

As the entire SharePoint Online team sites experience become modern, users can quickly and easily adjust to common settings without having to click into a classic site settings page multiple times. Instead, the tasks can be accomplished more intuitively within the context of what the users are doing.

SharePoint team sites and Office 365 Groups has taken integrated content collaboration to a new level, making it easier to create, manage and use the content and information throughout the work cycle. If you have any feedback or ideas in relation to SharePoint team site and Office 365 Groups integration, please leave it in the comments below.